So enjoy my messy studio and I'll see you back here on Friday!

Wednesday, May 18, 2016
Wednesday Worktable: A Video of My Worktable and What I'm Working On.
I've had an increase in viewers lately, so I thought you'd all like to see a little video. I'm currently in the process of shooting step by step photos of a new pattern.
So enjoy my messy studio and I'll see you back here on Friday!
So enjoy my messy studio and I'll see you back here on Friday!


Friday, May 13, 2016
Friday Finds: A Gift From Me To You!
This Friday is a little different. Instead of me finding things to show you I'm giving you a gift I made just for you!
I worked super hard for days to write and design this just for all my crafty people out there.


Do you have any idea what makes a really good pattern vs a poor or mediocre one? I breakdown the 6 most important things to look for when choosing a pattern.
Finding the right good, quality pattern makes all the difference between your confidently creating a good final piece you'd be happy to give as a gift or feeling frustrated and miserable about time and money wasted.
Come check out this guide and I hope you find it helpful!
I worked super hard for days to write and design this just for all my crafty people out there.
Ready to get your craft on but not sure how
to find quality patterns?
Finding the right good, quality pattern makes all the difference between your confidently creating a good final piece you'd be happy to give as a gift or feeling frustrated and miserable about time and money wasted.
Come check out this guide and I hope you find it helpful!
Wednesday, May 11, 2016
Worktable Wednesday: Making an Accessory Pattern Set
If you've read the post about making a PDF pattern HERE, then you already know I'm in the process of making a Penguin plush pattern. Actually that pattern is complete and just waiting while I finish the add on pattern set I decided to do.
I made prototypes of everything and then set them aside for a few days so I could let the excited feeling fade and then I could look at them again with fresh, rational eyes. (I tend to get super, over excited about things and miss mistakes and details so waiting a few days helps me see those things that I missed the first time around get ideas for changes)

I had an idea for glasses, yup glasses on a Penguin! See excitement, right? And I was sure I loved the design, but after a few days I realized:

I made prototypes of everything and then set them aside for a few days so I could let the excited feeling fade and then I could look at them again with fresh, rational eyes. (I tend to get super, over excited about things and miss mistakes and details so waiting a few days helps me see those things that I missed the first time around get ideas for changes)

I had an idea for glasses, yup glasses on a Penguin! See excitement, right? And I was sure I loved the design, but after a few days I realized:

- I didn't like the shape of the glasses, too superhero-ish.
- I wasn't thrilled with the design of the satchel, yeah there's a satchel too, squee!
- The small fish inside the satchel was too long and not detailed enough for my liking.
(yes the Penguin is carrying a satchel with a fish!), See I'm getting excited all over
again! - Going back and forth on whether I'm completely satisfied with the hat yet.
Pattern making is a longer process than you might think.My plan for the day was to figure out changes to the design and make new prototypes.But my DNA results from Ancestry.com came in and I've spent literally all day going over it and adding people to my family tree. Can you tell I'm easily distracted?So all my plans for today will be shifted until tomorrow.
If you found this post about pattern making interesting, check out this more in depth post on how I make patterns!
Friday, May 6, 2016
Friday Finds: Gnomes
Ever since the famous Gnome book first came out in the late 1970's early 1980's I've been fascinated with Gnomes. I would pour over the illustrations in the book, just enamored at all the wonderful little details and loving the tiny little woodland world they lived in.
So today's finds are all about Gnomes!


So today's finds are all about Gnomes!

Aimee Ray has the most wonderful little felt Gnome with embroidery pattern, that's always been a huge favorite of mine.

This Gnome print is just the cutest, with this Gnome doing his happy little thing with his tiny insect friends.

Debbie's Clay Art
A beautiful clay sculpture of the Gnomes from the book. So well done and a great keepsake piece for a Gnome lover.

Hoop art is awesome and this Gnome themed one would be an adorable gift for a kids room or a Gnome loving adult.

A Gnome garden Gnome! Seriously who wouldn't want one as a gate keeper for their garden?

Giant Gnome Paper Co

And finally, a set of Gnome greeting cards. Sent them of frame them, just have fun with them!

Here's my old Gnome that I'm going to be re-designing and making a new diy pattern of for a woodland series to be available this Fall.
If you have any ideas of what you'd like to see in a woodland series, please leave me a comment, I'd love to know!
Hope you enjoyed all the Gnomes! Give these shops some love!
Wednesday, May 4, 2016
Worktable Wednesday: FREE Mother's Day Felt Flower Pin Pattern and Tutorial
I've been so busy working on my for sale patterns lately that Mother's Day came up so fast.
 So I dropped everything and worked on a quick felt pattern for you to make for the wonderful mom in your life. This is a cute pattern for kids to make too.

I made my flower with 4 colors of felt but you can use 2 colors if that's what you have. I chose pinks and purples cause those are my mom's favorite colors.
You'll need:
Felt - at least 2 colors.
Scissors
Embroidery Thread - in colors that closely match your felt.
PDF Template
1-1/2" Pin Back
Button - large button in a coordinating color. The button I used was 2cm.
Optional: Hot Glue Gun and Felt Glue

 Gather all your supplies. Pin paper patterns on your felt colors and cut out flower shapes.
 Sew pin back onto the back of one of the bottom petal pieces. You could hot glue this too if you want to save time. You could also glue a hair clip on instead and make this a cute child's hair accessory.
 Set this piece aside until the rest of the flower is sewn.
 Applique stitch the larger petal overlay piece to the top of the 2nd bottom petal piece. (Not the one you sewed the pin back to) You could glue this down using felt glue.
 Sew the smaller petal overlay piece to the top of the top flower piece using an applique stitch just like the bottom piece.
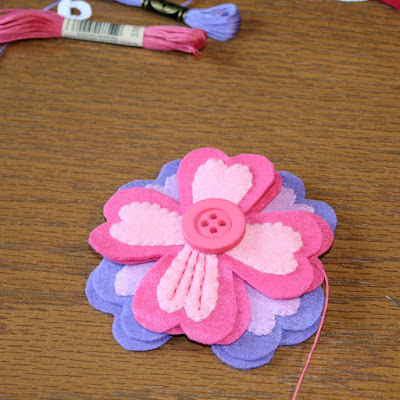 At this point I decided to add some simple embroidery back stitching to the petals. I thought the stitching added texture to the petals. You could leave the petals as is and move on the attaching the top back and the button. It's your project so have fun!
 I added stitching to both the petal overlays in the darker colors of the bigger flower pieces (dark pink and purple).
 Line up the 2 top flower pieces (shown here in dark pink) and blanket stitch together.
 Overlap the top flower piece (pink) and the top bottom flower piece (purple) and sew on the button through all 5 layers (but not the piece with the pin back).
 I changed my button at the last minute to this one.
 Flip the flower over and line up the bottom piece with the pin back to the other bottom piece (purple).
 Blanket stitch the 2 bottom (purple to purple) pieces together.
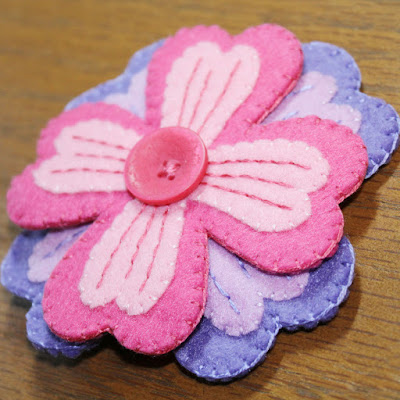 And you are done! Great job! If you make this project I'd love to see how yours came out. You can find me on Facebook and Instagram.


I made my flower with 4 colors of felt but you can use 2 colors if that's what you have. I chose pinks and purples cause those are my mom's favorite colors.
You'll need:
Felt - at least 2 colors.
Scissors
Embroidery Thread - in colors that closely match your felt.
PDF Template
1-1/2" Pin Back
Button - large button in a coordinating color. The button I used was 2cm.
Optional: Hot Glue Gun and Felt Glue

Download and print template. Cut template pieces out.


Subscribe to:
Posts (Atom)
LinkWithin
