Pages

Wednesday, June 29, 2016

Worktable Wednesday: FREE 4th of July Printable

We don't do much on the 4th of July. My brother usually has a big BBQ and sometimes I go for a while and sometimes I don't. There's always lots of people there for the whole BBQ cookout thing but since my mom is a vegetarian and I'm a vegan, it's not as much fun as it used to be and honestly I'd rather stay home and chill with my dogs anyway.

We do have a fantastic view of fireworks from our patio, which we enjoy every year. It's a nice perk to our condo that we didn't even know about until our 2nd year living here. 

Are You Ready For Your FREEBIE? 

I will admit I was a bit behind on doing this, I literally sat down yesterday and put it all together from the design to the prototypes to the photos, but the printable I made for you is really nice and I think you will enjoy it.

I love making printables that can be used several different ways. After all that's more fun and useful, right? 

I'm showing 3 different ways to use this one freebie and I know there's a ton more.


O.k. so here is what you will need:

  • The 4th of July Printable PDF
  • A 3 inch round die punch or scissors
  • Tape 
  • 1/4 inch (6mm) ribbon or any kind of string or yarn
  • Lollypop sticks 
  • 90lb white card stock or any weight you have
  •  

DOWNLOAD YOUR FREE PRINTABLE HERE


Download and print the 4th of July Printable, kind of a generic name but this is a down and dirty quick tutorial.


Olive photo bombed me as I was taking pics by the patio door.
 

Use your 3 inch punch die or cut out the graphics with scissors.


I like the die because it's nice and precise. 

I'm not even sure what to call this? A straw holder? Holiday straw decor? Don't know but I thought it was cute. So lets make one! 


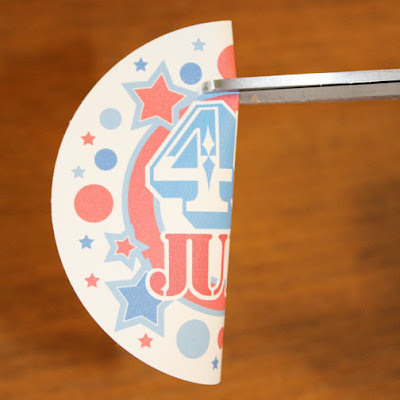
Gently soft fold the cut out graphic as shown. You don't want a big crease in the middle.


Using the scissors clip about 3/4 inch at the top and bottom as shown. I'm using scissors because I can't find my xacto knife.


Once the slits are cut slip the straw into the bottom slit as shown.


Then slide the straw thru the top slit as shown and you're done!

Guess what? Turns out this is the only straw in my entire house! I wanted to show a whole group together, but alas no.

Ready For The Next 4th Of July Idea?


Make those 4th of July cupcakes really stand out!
 

Take one of your graphics and a lollypop stick.


 Tape the stick to the back.


Now you've got a 4th of July cupcake topper. 

I also didn't have any cupcakes. Down and dirty crafting here you guys!


UPDATE: Found some mini cupcakes so I could take a photo for you guys.


Ready For The Last 4th Of July Idea?

 Who loves garlands? I do!


Cut out a bunch, bunch meaning how many you think you'll need.


Punch 2 holes sort of as shown. Doesn't have to be perfect! Tip: use a regular size hole punch if you are using the ribbon. It will work better and the graphics will lay flatter. I didn't and wish I had!


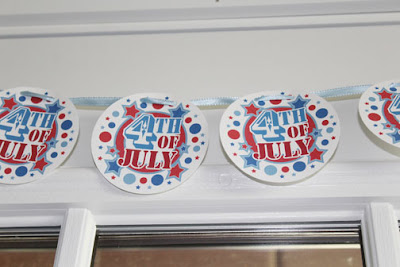
Thread ribbon through holes as shown and keep going until they are all threaded on. 


And ta da! A cute 4th of July garland!


And here is all 3 ideas together.

Isn't it weird how my studio pics are so yellow but my pics in the kitchen, that actually has yellow walls, is so bright and white? Maybe I should start shooting all my photos in the kitchen from now on, lol!

I hope you all have a Happy and Safe 4th of July and I hope you enjoy this 4th of July printable!
Monday, June 27, 2016

Everday Accessories Felt PDF Pattern Set Is Finished, And I'm Having A Sale!

Whew! I did it, I finally finished the Penguin plush felt add on accessory patterns! I ran into a lot of technical computer issues and I'm not gonna lie, there were some banging my head into a wall moments. But it's done and the relief I feel is amazing!


I am so very proud of these patterns. They are like my 2nd set of children, well maybe my 3rd set cause my dogs are my 2nd set.

I don't usually blog on Mondays, but I was much too excited to wait until Wednesday and this pattern deserves it's own post.


 I've named this pattern set Everyday Accessories.


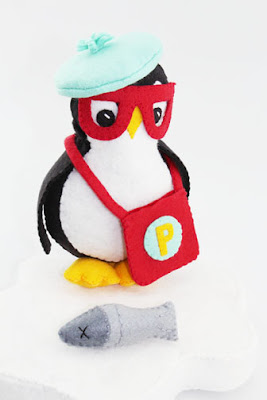
It contains 4 patterns to make a fish dinner for the penguin, a satchel to carry the fish, a jaunty little beret and removable glasses. There are also instructions for making glasses that aren't removable.


 Here's the felt Penguin plush wearing the accessories. Isn't this just the cutest?

The listing is now in my shop and these patterns are easy to make. I've written step by step instructions with photos to explain the whole process.

I also made another listing of both the penguin and the accessories together. 


I made a bundle of the 2 sets of patterns that you can buy together for a lower price than if you bought them separately.

I'm just so giddy about these patterns! I hope you all like them half as much as I do! 


I'm so excited that I decided to have a pattern sale!


Head on over to my website and use this awesome coupon code, PATTERNSALE20, for great 20% OFF savings!
 
 I also added links to all my patterns in the blog side bar. Now I'm off to make another pattern!

Friday, June 24, 2016

Friday Finds: 8 Awesome Handpicked Mermaid Finds

Mermaids have always been a favorite of mine. I just loved the Hans Christian Anderson tale of the Little Mermaid. This was pre Disney's animated tale, when kids read books instead of watching movies. Don't get me wrong, I love animated movies (I have quite a passion for them) but the stories from the books, are so much more dear to my heart.


Mermaids are just so special!


Mermaids are brave and fearless and beautiful. They live in the sea and have fish for friends. Who wouldn't want to at least try out that life? 

And yes, I know mermaids aren't "real", but just imagine if they were? How amazing would that be?


I handpicked a collection of awesome Mermaid related things for you today.


Just the cutest sparkly Mermaid cupcake toppers. I love that these Mermaids come in different skin tones and hair colors.


Awesome personalized Mermaid wall decal. I would love to put something like this in my studio.


How amazing is this?! Your child can be a mermaid! Several different colors and style Mermaid tails are available too. As a child, who spent hours at the local swimming pool, I would have LOVED this!

Whimsical and fun Mermaid wood sign. Perfect for a kids room or decor for any Mermaid loving home.


"Always be a Mermaid"...words to live by. I'm loving this great Mermaid print.


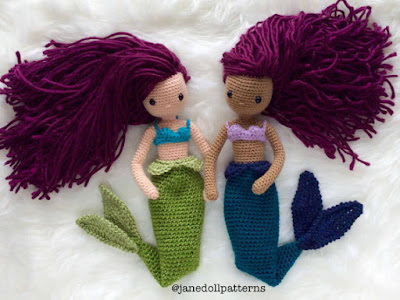
The most adorable Mermaid crocheted dolls. These dolls are quite fabulous and perfect for imaginary play!


I'm so crazy about this sweet baby mermaid outfit! I wish things like this were around when my daughter was little, I would have loved a photo of her in this!

I have a trio of Mermaid beauties in my shop right now that are looking for homes. 

I hope you'll stop by and pay them a visit. 


These lovely Mermaids are one of a kind felt and fabric plush dolls. They have 3 different skin tones and designs.


I'm curious if anyone would be interested in a downloadable Mermaid print like this or similar? I'm considering adding this to my shop and need some feedback. 

Please leave a comment below or email me, thank you!

I hope you enjoyed my finds for this week!
 

Wednesday, June 22, 2016

Worktable Wednesday: Felt Craft Pattern Almost Finished!

This felt craft add on pattern for my previous felt Penguin pattern is almost done. The template pages and the cover still need a bit of tweaking but this will be in my shop soon.


I'm So Excited!

I'm really excited about this set of felt patterns. You'll get 2 ways to do glasses for the Penguin, a cute beret hat, a satchel and a fish dinner, all in one pattern. All my patterns have step by step photos and instructions to guide you along the way.

If this pattern goes well, and I really hope it does! I have other pattern ideas for a whole series of play set type things for the Penguin to do. 

Sneak Peek! 

 You are the first to see the completed set on the Penguin! Isn't this so adorable?!


So Very Busy!

I've been working on a lot of back end stuff lately for my business: Cleaning up my Pinterest boards, updating older blog posts, connecting series of post together and trying to finish the Porter the Penguin add on pattern.

I have also made good progress on the felt castle nursery art, but a nasty case of what I suspect is vertigo is making being on the computer a challenge. I can't do my work without at least some time on the computer so I'm just pushing forward as best I can.

Next Pattern Coming Up! 

 I'll re-design this old felt seahorse pattern of mine. This is a simple pattern but I think I'll add some more easy to do details to make this pattern special.
 

So keep your eye out for this felt seahorse pattern to launch this summer! I'll do posts about the designing and making of it too.

What's Next?

Very soon I'll be working on my (maybe Halloween?), Christmas and Winter Holiday Patterns for sure for the Fall. So far my ideas are felt ornaments and possibly easy to make plush characters.

I appreciate all the page views I've been getting lately and will continue to post on a regular schedule. If you have any questions, please leave a comment or email me. My email can be found on the contact page at the top of the blog. You can also follow me on Facebook and Instagram and Pinterest.

Friday, June 17, 2016

Friday Finds: 6 Of My Favorite Woodland Critter Patterns On Etsy


  I am crazy in love with woodland critters!

Around my house we have deer, coyotes, ducks, geese, chipmunks and all variety of small birds. I enjoy watching these wonderful animals through my studio window, so I thought I'd pull together a Friday Finds of 6 of the sweetest little woodland critters from Etsy.


I love the simple yet super winsome designs of these adorable creatures! I can see right off that they will be easy to sew and I would love to make these sweeties to keep me company in my studio.


These lovely cuties can be made into a backpack charm, an ornament or a fun plush. Kids would really love these.


One of my all time favorite pattern makers, has these ultra divine little felt animal doll patterns. I'm a big lover of animals wearing clothes, my felt animal dolls always wear clothes too.


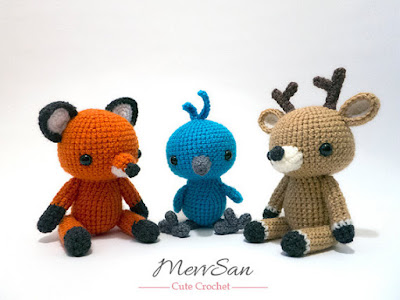
I can only crochet a little bit but these woodland patterns make me wish I could learn enough to make these charming creatures.


These attractive little felt plush woodland critters pattern lets you make a whole forest of fun and amusing critters.


And last not not least I found these delightful and colorful woodland animal nursery embroidery patterns. Super cute for kids and whimsical loving adults like myself.

I can't end this post without sharing a few of my woodland critters. Excuse the naked fox, she still needs her clothes. I'm going to have a big sale in the beginning of July on all my felt dolls. Rock bottom prices because I need to clear my shop out for lots of new and exciting things that are coming. These are all OOAK pieces and have to go! 

I'll let you once I have all the sale details worked out, so if you see something you want keep checking my shop for the sale!
 If you liked this post, check out this woodland favorites post too!

Wednesday, June 15, 2016

Worktable Wednesday: Father's Day Felt Freebie Kindle Cover Pattern and Tutorial

Let's face it, Father's Day presents can be pretty crappy. I tried to come up with a quick and easy project that was nice enough to give as a gift. I hope I did. 

So, here is my FREE pattern and tutorial for a Felt Kindle Cover for Father's Day.


Here is what you will need: 

  • 1 - 9" x 12" piece of felt in whatever color you like. I used blue.
  • Small scrap pieces for the collar, hanky and bow-tie in your preferred colors.
  • Sharp scissors.
  • Pins.
  • 4 small buttons in any color you like. I used 1cm white ones.
  • Embroidery thread that matches each of your felt colors.
  • Kindle Cover Pattern template. (see below for pattern link)
  • Optional: glue gun if you don't want to do the hand sewing. 

 Print and cut out the Kindle cover PDF pattern, it is a 2 page file, pin it to your color choices of felt and cut everything out.

 Start by positioning this strip in the middle of the 2 1/2 inch mark ( the cover front is 5" ) or you can just eye it for placement.

Pin this strip in place the buttons will be sewn on it later.

Applique stitch the strip to the front of the Kindle cover using 3 strands of matching embroidery thread only along each side but not the top or bottom.


Next pin the 2 collar pieces in position and applique stitch using 3 strands of matching embroidery thread starting from the far outside (right top) down to the point and up to the middle of the neck as shown above.

Then blanket stitch around the neckline to the beginning point on the far right. Knot and tie off. Repeat on the other collar piece, sewing from the top left to the point and around left to the beginning.


This is what it will look like when the collar is sewn on.

Sew on the buttons. Mine are a little crooked which is driving me nuts but I'm just going to leave it.

 Pin the pocket and hanky to the front of the Kindle cover.

Applique stitch around the pocket using matching thread and then applique stitch around the hanky using that matching color thread, knot and tie off.


Pin the bow tie in position and applique stitch all the way around using matching thread. Knot and tie off.

And finally you are in the home stretch!  Fold the Kindle cover and match up the edges. Pin to hold in place and blanket stitch starting from the far left bottom edge and sew your way around the bottom and up the right side, using matching embroidery thread. Knot and tie off.

  And you are done!

 
 Side your Kindle in and see how cozy it is in it's new Kindle Felt Cover.

 I like how the Kindle logo peeks out so you know exactly what's in there.

 A felt Kindle cover project that is easy and takes very little time to make.


LinkWithin

Blog Widget by LinkWithin