Supplies:
- Green felt and Pink felt (not shown)
- Pins (not shown)
- 1 or 2 green colors of embroidery thread
- 1 or 2 pink colors of embroidery thread.
- White embroidery thread (optional)
- Small black buttons in any size. The ones pictured come
in a pack with both black and white buttons and are 1/4". - Scissors.
- #5 embroidery needle or whatever you have on hand.
- 1 Alligator clip 1 3/4"
- Low temp glue gun or other adhesive.
- Happy Shamrock Pattern Template.
- Parchment paper or tracing paper.
Download Pattern Template Here
Cut out template and pin together two layers of green felt. Carefully cut out.
I've provided a template for the detail stitching. You can either freehand sew it or trace it on parchment paper as shown here.
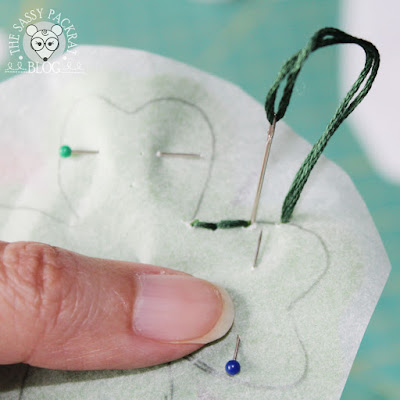
Pin the parchment paper to the top shamrock piece. Parchment can be slippery so line it up careful and pin that sucker down so it doesn't move on you!
Sew using all 6 strands of embroidery thread with a running stitch through the felt and parchment paper.
Stitch all the way around the template. It'll look weird and messy until the paper comes off and then it'll look great.
Carefully tear the outside of the parchment paper off. It comes of easily. Then use a pin to lift a piece from the inside and pull that piece off too.
Sewn on the eyes using 3 strands of embroidery thread in any color you like. I used white here because I like the life-like look it gives this cutie. Turn the holes of the buttons upright as shown to get this look.
Put a bead of hot glue on the top of the alligator clip. Tip: make sure you are holding the clip open when you glue it to the back of the shamrock piece, otherwise you'll glue it shut and you'll be sad. I used low temp glue which helped when my clip closed accidentally and I was able to quickly pry it open before it set without burning myself. Yep it happen to me.
Remember to glue the clip on the back of the other piece. Not the one you just spent sewing all the details on. Here I made one hair clip and one pin.
You're almost done! Put both sides of the shamrock pieces together and take the embroidery thread that matches your shamrock and blanket stitch using small even spacing all the way around.
There, now you are done. How cute is this?!
Clip your Happy Shamrock guy on and celebrate the day!
If you liked this pattern and tutorial leave a comment and let me know. I'd love to make more for you!
I also have more FREE patterns available if you subscribe to my newsletter! You really don't want to miss out! Click here to join!
If you liked this pattern and tutorial leave a comment and let me know. I'd love to make more for you!
I also have more FREE patterns available if you subscribe to my newsletter! You really don't want to miss out! Click here to join!


1 comment:
Cute!!!! I will dig through my stash and see what I can find!! Hopefully there is some green!! The tutorial was easy to follow but I may switch to perle cotton since I have loads of that for bear noses and no embroidery floss!!
Looking forward to the next pattern and tutorial!!
Post a Comment